The installation of WordPress on desktop offers a lot of advantages. It gives a testing ground to test new themes, plugins and site design. A complete WordPress site can be built offline and then uploaded to a live hosting account.
In this tutorial, we will look into the steps involved to setup WordPress using WAMP and XAMPP. WAMP and XAMPP are a compilation of Apache web server, MYSQL and PHP, created for Windows environment.
You need Windows XP, Vista, Windows 7 or Windows 8 for the installation to work.
Setup WordPress Using WAMP
- Visit this link and install WAMP server. Go for 32-bit encryption. It takes few minutes for the download to complete.
- Once downloaded, run the program and follow the on-screen instructions. The process runs simply.
- Depending on your system, you may be asked to choose a preferred browser. If you don’t, the server will use Internet Explorer by default. If you don’t want IE, choose Firefox or Chrome.
- Launch WAMP server.
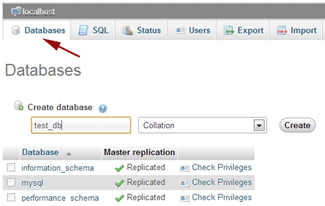
- Click on phpMyAdmin > Database > Create. Give a name to your WordPress database.
- Visit this link and get your copy of WordPress.
- Extract the WordPress file and rename it, ideally your blog’s name.
- Copy and paste the file in C:wampwww.
- Open your chosen web browser and type https://localhost/blogname. Replace blogname with the real name you gave to the WordPress file in step 7.
- You’ll find the wp-config.php as missing. Click on Create a Configuration
- In the page that opens, mention the database name as you created in step 5, leave everything as default and click Submit.
- The next page will show that the configuration file is successfully created and is ready to install WordPress. Click Run the Install.
- Fill up the username, password, email, blog name and click Install WordPress.
- Go to https://localhost/blogname/wp-login.php and login with the credentials just created.
Setup WordPress using XAMPP
- Visit this link and download the XAMPP server. Go for 32-bit encryption. It takes few minutes for the download to complete.
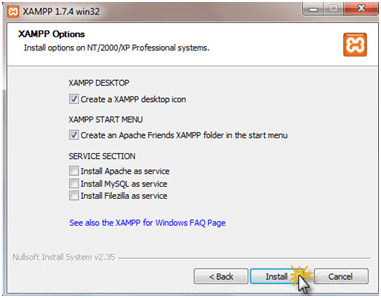
- Once downloaded, run the program. Choose your language and where you want to store the program and click on Install.
- Sometimes Windows disallow running the program so disable Firewall beforehand.
- Open the newly installed XAMPP and hit Start on Apache and MySQL
- Visit https://localhost to see if everything is properly installed.
- Go back to the XAMPP control panel and click on Admin besides MySQL.
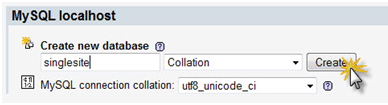
- The browser will open a new page; the MySQL dashboard. Create a new database. Naming it after your site is the best option.
- Visit this link and get your copy of WordPress.
- Extract the WordPress file and rename it, ideally your blog’s name.
- Open XAMPP and find htdocs Drop the WordPress files in this folder.
- You need to configure WordPress now. Open the wp-config-sample.php file and do these changes.
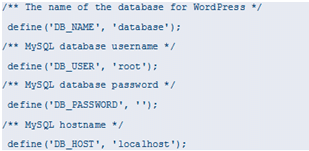
- Change ‘database’ to the actual database name you gave in step 7.
- Save the file in the root WordPress folder and name it as wp-config.php.
- Go to https://localhost/blogname and you will see the WordPress setup page.
- Fill up the username, password, email, blog name and click Install WordPress.
- Go to https://localhost/blogname/wp-login.php and login with the credentials just created.
No matter which process you used, the WordPress will be setup on your system locally and you are free to do whatever you want. Test a new design, prepare for a blog launch, and test plugins before installing it on a live site and more.
Note:
If you used the WAMP process, a conflict may arise if you’re using Skype as well. This is because both Skype and Apache use port 80. There is a quick remedy. Login to Skype > Tools > Options > Advanced > Connections. Uncheck the tab which says “Use port 80 and 443 as alternatives for incoming connections”. Save the setting and restart Skype. Now launch WAMP. It will work.
You can create a whole WordPress site locally and then upload it on a live server. Uploading it on a live server is a bit tricky if you don’t know the correct steps.