
Theme and plugin conflicts can break your WordPress site. They cause layout problems, disabled features, or even crashes. Here’s how to prevent them:
- Check compatibility before installing: Review update history, user reviews, and compatibility with your WordPress version.
- Keep everything updated: Regularly update WordPress core, themes, and plugins to fix bugs and maintain compatibility.
- Test updates safely: Use a staging site to test updates before applying them live.
- Audit your tools: Remove outdated or unused plugins every few months to reduce conflicts.
- Avoid redundant tools: Don’t use multiple plugins for the same purpose (e.g., two SEO plugins).
Key tip: Always back up your site before making changes. If something goes wrong, troubleshooting tools like debugging or diagnostic plugins can help identify the issue. Regular maintenance and smart practices will keep your blog running smoothly.
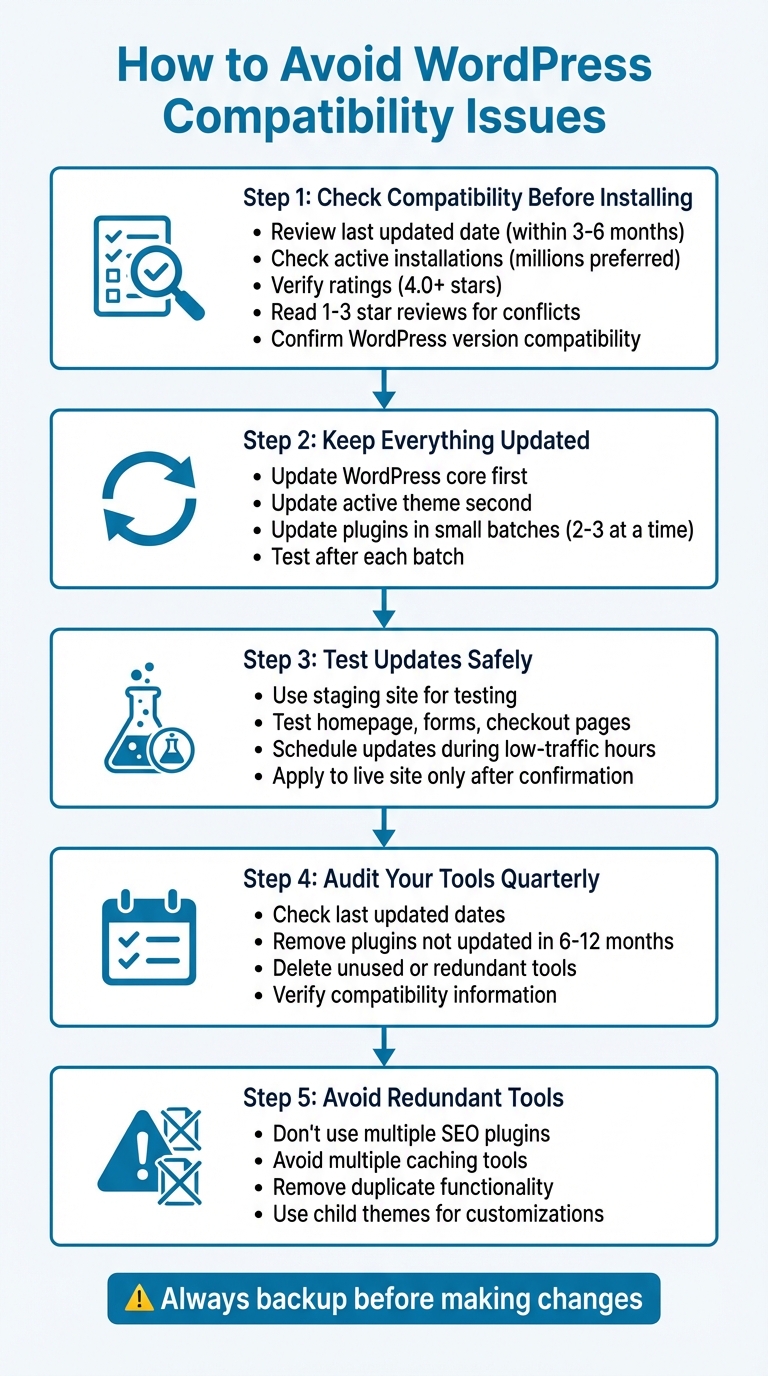
WordPress Compatibility Issue Prevention: 5-Step Process
Deploy with Confidence! Test WordPress Plugins & Themes Safely Using This Method
Check Compatibility Before Installing Themes or Plugins
When it comes to maintaining a smooth-running WordPress site, checking compatibility before installing themes or plugins is a step you simply can’t skip. Taking a few minutes to evaluate compatibility can save you hours of frustration later. Plugin conflicts are a common source of problems, leading to broken layouts, malfunctioning features, or even site crashes when themes and plugins interfere with each other’s code.
Review Developer Information and Support
Start by looking at the last updated date on the WordPress.org repository or the developer’s website. If a plugin or theme hasn’t been updated in over six months, it could pose security and compatibility risks. Ideally, stick to tools updated within the last three to six months. Also, check the active installations – plugins with millions of active users and an average rating of 4.0 stars or higher are typically safer choices, as they’ve been tested across various sites and environments.
Don’t skip the recent user reviews, especially those with one- to three-star ratings. These often highlight issues like conflicts with other plugins, PHP errors, or slow developer responses. Additionally, visit the support forum to see how responsive the developer is. If you notice many unresolved issues like "site broke after update" with no replies from the developer, consider it a warning sign.
Verify Compatibility With Your WordPress Version
Each plugin or theme listing includes details like "Requires WordPress version" and "Tested up to". Compare these to your current WordPress version, which you can find under Dashboard → Updates. Avoid tools marked as "Untested with your version of WordPress" unless you’re testing them in a staging environment. Also, double-check your hosting plan’s PHP version requirements. For instance, if a plugin needs PHP 8.1 but your host is running PHP 7.4, activating it could cause fatal errors or a blank screen.
Assess Plugin Dependencies and Conflicts
Review the plugin or theme documentation for any dependencies, such as required companion tools like WooCommerce, Elementor, or specific PHP extensions. Some themes are built to work exclusively with certain page builders, like Elementor or WPBakery, and using a different one could result in layout or styling issues.
A critical rule: avoid running multiple plugins that serve the same purpose. For example, using two SEO plugins (like Yoast and Rank Math) or multiple caching tools almost always leads to conflicts. Audit your existing plugins to prevent redundancy. If you already have a caching plugin, skip adding another. Similarly, if you rely heavily on a particular page builder, choose themes and add-ons that explicitly state they’re compatible with it.
Keeping your WordPress site secure and functional also requires consistent updates for WordPress itself, along with your themes and plugins.
Keep WordPress Core, Themes, and Plugins Updated
Keeping your WordPress site up to date is one of the simplest yet most effective ways to avoid compatibility issues and security risks. Updates address bugs, patch vulnerabilities, and ensure your site works smoothly with the latest features. Ignoring updates can leave your site open to problems like broken layouts, crashes, or sluggish performance. In fact, security reports frequently highlight outdated plugins and themes as major entry points for attacks on WordPress sites.
Prioritize Updates Based on Importance
Not all updates are created equal, so it’s smart to handle them in order of priority. Start with WordPress core updates, especially security and maintenance releases, which should be applied as soon as they’re available. WP Engine stresses:
running older versions is generally more dangerous than the occasional bug in new versions
For major WordPress updates (e.g., moving from version 6.4 to 6.5), it’s best to test them on a staging site before rolling them out on your live site.
Once the core is updated, focus on your active theme. A theme conflict can disrupt your entire site’s layout, so it’s crucial to address this next. Finally, update your plugins, but don’t do them all at once. Update in small batches – two or three at a time – and check your site after each round. This step-by-step approach makes it easier to identify and resolve any issues caused by a specific update. Always test the updates on a staging site first to ensure everything works as expected.
Test Updates in a Staging Environment
A staging site is essentially a duplicate of your live site, giving you a safe space to test updates without affecting your visitors. Many hosting providers offer built-in staging tools, or you can use a plugin like WP Staging to set one up. Once your staging site is ready, apply all pending updates for the core, theme, and plugins.
After updating, thoroughly check key areas of your site – like the homepage, blog posts, contact forms, and checkout pages – to confirm they’re functioning as they should. Once you’re confident everything works properly, you can roll out the updates to your live site. To minimize any disruptions, U.S.-based bloggers might want to schedule updates during low-traffic hours, such as late at night in their primary time zone.
Remove Outdated or Unsupported Plugins
Plugins that haven’t been updated in 6–12 months are often abandoned and can pose a security risk. To identify these, go to your WordPress dashboard, navigate to Plugins → Installed Plugins, and sort by "Last Updated." Deactivate and delete any plugins that haven’t been updated in over a year or show signs of being unsupported.
If you’re unsure about a plugin, check its page on WordPress.org for the "Last updated" date and compatibility details with your current WordPress version. Plugins with unresolved support issues or frequent conflict reports are best replaced with better-maintained alternatives. A streamlined, actively-supported set of plugins reduces the chance of conflicts and makes managing updates a lot easier.
sbb-itb-112c64b
Diagnose and Fix Compatibility Conflicts
After running updates, you might still encounter compatibility conflicts. These issues can show up in various ways, like the dreaded White Screen of Death (WSOD), broken layouts, missing menus or widgets, forms that won’t submit, checkout errors, or even sudden slowdowns and 500 errors. Such problems often arise after installing or updating a theme or plugin. Before diving into troubleshooting, clear your browser cache and test your site in an incognito window to rule out browser-specific glitches. If the issue persists across different browsers and devices, and it started after a recent change, chances are you’re dealing with a compatibility conflict. To zero in on the problem, start by enabling debugging.
Enable Debugging in WordPress
Debugging can reveal the errors happening behind the scenes. To enable debugging safely on a live site, access your site files using your hosting file manager or an SFTP client. Open the wp-config.php file and locate this line:
define( 'WP_DEBUG', false ); Replace it with the following code:
define( 'WP_DEBUG', true ); define( 'WP_DEBUG_LOG', true ); define( 'WP_DEBUG_DISPLAY', false ); @ini_set( 'display_errors', 0 ); This setup logs all PHP errors and warnings to the /wp-content/debug.log file without showing them to your site visitors, keeping your site professional while you troubleshoot. After saving the changes, reproduce the issue by refreshing the page or repeating the problematic action. Then, check the debug.log file for errors like PHP Fatal error, Warning, or Notice, particularly those referencing paths like /wp-content/plugins/plugin-name/... or /wp-content/themes/theme-name/.... Errors mentioning "undefined function", "class not found", or "deprecated function" often point to plugins or themes that are incompatible with your WordPress version or with each other. Once you’ve identified the issue, set WP_DEBUG back to false to avoid bloated log files and potential performance hits.
Use Diagnostic Tools and Plugins
If reading error logs feels overwhelming, diagnostic plugins can make troubleshooting easier. A great option is the Health Check & Troubleshooting plugin. It includes a "Troubleshooting Mode", which temporarily deactivates all plugins and reverts to a default theme – just for your logged-in session. This means your live site remains unaffected for visitors. In this mode, you can re-enable plugins one by one, testing your site after each activation until the issue resurfaces, helping you pinpoint the conflicting plugin.
Another handy tool is Query Monitor, which provides detailed information about PHP errors, database queries, hooks, and enqueued scripts or styles, all organized by plugin or theme. This can help you identify what’s causing errors or slowing down your site. Additionally, the Better Plugin Compatibility Control tool can flag plugins that aren’t marked as compatible with your WordPress version. A recommended approach is to start with Health Check & Troubleshooting, confirm that the issue disappears with all plugins off and a default theme active, and then reactivate essential plugins one at a time until the problem returns.
Switch to Default Themes for Troubleshooting
Sometimes, the issue lies with your theme. Switching to a default WordPress theme, like Twenty Twenty-Four, can help determine whether your custom theme is the source of the problem. If you can access your dashboard, navigate to Appearance → Themes, install and activate a default theme from the WordPress repository, and then test the affected pages or features. If the problem disappears, your original theme is likely clashing with a plugin or the WordPress core.
If the WSOD locks you out of your dashboard, you can use SFTP or your host’s file manager to rename your active theme’s folder (e.g., change my-theme to my-theme-disabled). This forces WordPress to fall back on a default theme, allowing you to test your site again. Once you’re done, remember to restore your original theme. For extended troubleshooting, it’s a good idea to use a staging site to avoid disrupting your live site and visitors.
Best Practices to Prevent Future Compatibility Issues
After tackling compatibility problems, it’s wise to take steps that help avoid similar issues down the road. By following these smart practices, you can keep your blog running smoothly and minimize disruptions.
Use Child Themes for Customizations
Making custom changes to your theme – like adding CSS, tweaking templates, or modifying functions – can be risky. Why? Because when you update the parent theme, all those changes are wiped out. This puts you in a tough spot: skip updates and risk security issues, or update and lose your customizations. The solution? Child themes.
Child themes let you keep your customizations separate from the parent theme. They inherit the parent theme’s design and features, but store your changes safely. So, when the parent theme updates, your customizations stay intact, and your site remains compatible with the latest WordPress version and plugins.
To create a child theme, go to the wp-content/themes folder and make a new directory, like parenttheme-child. Add a style.css file (referencing the parent theme) and a functions.php file to enqueue the stylesheet. If this feels tricky, tools like Child Theme Configurator can simplify the process.
Disable Automatic Updates
While automatic updates sound convenient, they can sometimes cause conflicts at the worst times. Disabling them gives you more control, allowing you to schedule updates when traffic is low and after you’ve prepared backups and tested in a staging environment.
Set up a managed update schedule instead. For example:
- Perform updates weekly during off-peak hours.
- Always take a full backup beforehand.
- Test updates in a staging environment before applying them live.
- Update in small batches – two or three plugins at a time – and review key areas like forms, checkout pages, or other revenue-generating features.
If something breaks, roll back using your backup and contact the plugin or theme developer for help.
Regularly Audit Your Blog’s Tools
Even the best plugins and themes can become outdated or unnecessary over time. A quarterly audit helps you identify and remove abandoned or redundant tools, ensuring everything on your site meets current WordPress standards.
Here’s how to conduct an audit:
- Make a list of all active plugins and your theme.
- Check the last update date, compatibility information, and user reviews.
- Remove any plugins that are abandoned, duplicated, or unnecessary. Prioritize tools with millions of active installations, high ratings (above four stars), and recent positive feedback.
- After deactivating or replacing tools, test your site to confirm everything works as it should.
Platforms like Blogger Outline can simplify this process by recommending essential plugins for SEO, content creation, and monetization. These audits, combined with regular updates and compatibility checks, help maintain a fast, secure, and reliable blog over the long term.
Conclusion
Key Takeaways for Bloggers
Avoid compatibility headaches on WordPress by adopting smart, proactive habits. Before installing any plugin or theme, take a moment to check for developer support, ensure your WordPress version aligns with the tool’s requirements, and prioritize options with millions of active users and ratings above four stars. When it’s time to update, approach it methodically: test plugins in small batches on a staging site, back up your entire site, and schedule updates during low-traffic periods. If something goes wrong, enable debugging, use diagnostic tools to identify the issue, or switch to default themes to help isolate conflicts.
For long-term stability, use child themes to preserve customizations and maintain control over updates. Regularly – about every three months – audit your plugins to remove outdated or unnecessary ones. Avoid overlapping tools, like using multiple SEO or caching plugins, as these can often clash and slow down your site.
By following these steps, you’ll save time, protect your income, and ensure your blog runs smoothly. A well-maintained WordPress site, equipped with the right tools and regular updates, will perform better and more reliably over time.
Using Resources Like Blogger Outline

Staying on top of WordPress compatibility doesn’t have to be overwhelming. Expert resources like Blogger Outline can simplify the process. Blogger Outline offers practical guidance on plugin selection, staging site setup, and streamlined audits. It also provides insights on SEO strategies, content creation tools, and monetization setups that integrate seamlessly with WordPress, making your blog conflict-free and more efficient.
Explore Blogger Outline at https://bloggeroutline.com for tailored advice on update schedules, plugin recommendations, and troubleshooting workflows. Start by auditing your plugins – check their "last updated" dates and remove anything outdated. Then, use Blogger Outline’s resources to keep your blog fast, secure, and ready to grow as your audience expands.
FAQs
How can I test WordPress updates without risking my live site?
When it comes to keeping your live site secure, setting up a staging environment or a local test site is a smart move. These setups let you test WordPress updates in a controlled space, ensuring there are no conflicts with your theme or plugins. Once you’ve tested and verified that everything runs smoothly, you can confidently apply the updates to your live site.
What should I do if a plugin or theme crashes my WordPress site?
If a plugin or theme causes your WordPress site to crash, don’t worry – it’s fixable. The first step is to deactivate the problematic plugin or theme. You can do this using your hosting file manager or an FTP client, which will help you regain access to your site. After deactivation, here’s how to resolve the issue:
- Update the plugin or theme: Ensure it works with your current WordPress version.
- Check for conflicts: Look for compatibility issues with other plugins or your theme.
- Consider alternatives: If the issue persists, replace it with a more reliable or updated option.
Remember to back up your site before making any changes to safeguard your data during the troubleshooting process.
How often should I check my WordPress plugins for compatibility issues?
To ensure your WordPress site stays in top shape, make it a habit to review your plugins for compatibility issues every three months. It’s also wise to conduct a check whenever you update WordPress core, your theme, or any plugins. These regular audits can help you avoid conflicts and keep your site secure and running smoothly.